The chances are that you are probably a passionate gamer since you are looking for the best case for your PC. It’s an essential part of your setup, and unfortunately, many people neglect it. Instead, they spend all the money on other components, such as a graphics card, RAM, and CPU.
A good PC case has numerous benefits for your computer, and not buying a proper case might also lead to various situations that have a terrible effect on your PC. The truth is, a PC cabinet is not used only to make your computer look nicer. It can also have different cooling features, and its internal shape can prevent your GPU from getting hot too fast, therefore increasing its lifespan.
On the other hand, a PC case can come with various benefits that will pay off in the long run. For example, it can include a carrying handle, over ten expansion slots, tactically placed ports for the most effortless reach and usage, and many more. However, you should know that with more features comes the higher price. Also, no PC case will meet every gamer’s needs. There are various factors that you should consider before buying and choose the right case that suits all your needs.
In this article, we will review the best PC cases that you can buy in India. We will review the most expensive ones, but don’t worry – there are products for everyone’s budget. Before we begin the review, let’s first mention a few things that you should keep in mind while buying a PC case.
Trends and Changes in PC Chassis Market
Most PC cases offer adequate room for cable management and other necessary stuff, but as time goes by, the internal parts’ sizes gradually increase. You might have noticed that, for example, graphics cards tend to be bigger nowadays. Things like that directly lead to more space needed when building a new setup. That’s why “tower” is an ideal platform for a new PC build or upgrade.
In the past few years, we’ve noticed some decent changes when it comes to PC cases. At first, most chassis tended to have quite aggressive Sci-fi, futuristic look. However, manufacturers recently switched to another kind of PC case style. Most cases nowadays tend to have a simple, subtle, and minimalistic look. You might have also noticed that glass and acrylic side panels have become very popular, as well as various mood lights.
There were also significant changes when it comes to the definition of a tower case. At first, towers were over 20 inches tall, which is mainly the reason they were called towers. However, as 5.25-inch bays for optical drives are slowly removed, tower cases of 18-inch height are slowly becoming the norm and not the exception. After all, who needs CDs and DVDs anymore? They are slowly dying out, and as it seems, we won’t be seeing them anytime soon.
On the other hand, you might have noticed that the width of PC cases is a bit increased. Since you can build a setup of two bulky graphics cards and liquid cooling, it’s no wonder that PC towers are still a bit large. They are large, but in a different way than they used to be.
Drive Bays and Front Panel Ports
When it comes to “drive bays,” the calculation is simple. Bays are usually 2.5-inch, 3.5-inch, or 5.25-inch, and they are used for hard drives and optical drives, which directly affects the tower size. Plus, have in mind that you should have at least one bay more, for any possible upgrades in the future.
On the other hand, front-facing ports don’t vary too much and don’t take much space. The usual mix includes a part of USB 3.0 ports, maybe a pair of USB 2.0 ports, and jacks for headphones (speakers) and microphone. The number of USB 3.0 ports can vary. If you buy a brand new, high-end PC case, it will most probably have USB 3.1 Type-C ports as well.
Liquid or Air Cooling
Adding a liquid cooling system is an excellent way to increase your hardware’s lifespan. However, installing liquid cooling can sometimes be a bit tricky. The first thing that you have to do is to check the size of the radiator (or radiators). There are two aspects that you should check: radiator thickness and radiator length in millimeters.
The thickness is measured because you have to ensure that the radiator and its components don’t interfere with the mainboard. The length is usually affected by the number of fans you install. Therefore, you have to carefully measure both length and thickness to see if the cooling system can fit in your PC case.
When it comes to air cooling, things are a bit different, since you will get at least a couple of pre-installed fans when you buy a new chassis. Also, new fans are pretty cheap, so upgrading your air cooling system isn’t a big deal.
Another thing that you should keep in mind is air filters. If you have ever dismantled your PC case, you must have noticed how much dust there is. Therefore, it’s much better to have filters to collect it, then to let the dirt cover your GPU, CPU, RAM, and other stuff.
Quick Shopping Tips
Figure out which parts do you want to buy first. Of course, aesthetics are important when purchasing a new PC case. However, it’s more vital that you decide which components you are going to buy first. When you decide which graphics card, motherboard, cooling system, and other parts do you need, you will know what tower size you should aim for.
You don’t need a massive tower. Some PC components have grown bigger over time; however, some are much smaller. For example, take a look at SSD hard drive. It’s smaller than ever. Even some multi-card setups are smaller than they used to be. Having that in mind, the chances are that for a good gaming setup, you won’t need a huge tower.
A proper cooling system is mandatory, especially in small PC cases. If you have high-end components, such as a graphics card that works at high RPM, keeping them in a small case will result in a faster heat up. Therefore, a proper cooling system is essential if you want to increase the lifespan of your expensive gaming parts.
Smaller cases are more challenging to build. Of course, smaller cases are usually better when it comes to space-saving. However, if you have never built a PC case yourself, you might find it challenging to do. If you have a small case, you will have to be very patient to fit all the parts correctly, and still maintain the cooling. It’s hard to do, but once you do it, you will be satisfied.
Build a nice-looking chassis. If you don’t care about aesthetics at all, or if your case is hidden far under the desk, then you don’t have to worry about the chassis design. If that’s not the case, then you should find a tower that looks visually appealing. For example, it should have a glass-enclosed rainbow of RGB LEDs or whatever suits you. Since you will be looking at it day after day, it should be looking decent.
| Product | Size | Best For | M/B Compatibility | Rating |
|---|---|---|---|---|
| Cooler Master MasterBox MB530P | 19.2 x 9 x 18.4 | High-Visibility Builds | ATX, Micro ATX, Mini-ITX | 10/10 |
| Cooler Master MasterCase SL600M | 22.6 x 9.6 x 21.5 | Deluxe ATX Builds | ATX, Micro ATX, Mini-ITX, some E-ATX | 9.5 / 10 |
| In Win 805 | 17.9 x 8 x 18 | Extreme and Showcase Builds | ATX, Micro ATX, Mini-ITX | 9.5 / 10 |
| NZXT H700i | 19.5 x 9 x 19.5 | Showcase Builds | ATX, Micro ATX, Mini-ITX, some E-ATX | 9 / 10 |
| EVGA DG-77 | 19 x 8.3 x 18.8 | Showcase Builds | ATX, Micro ATX, Mini-ITX | 9 / 10 |
| Corsair Carbide Clear 400C | 18.3 x 8.5 x 16.7 | On-budget Builds | ATX, Micro ATX, Mini-ITX, some E-ATX | 8.5 / 10 |
Top 6 PC Cases (CPU Cabinets) in India in 2020
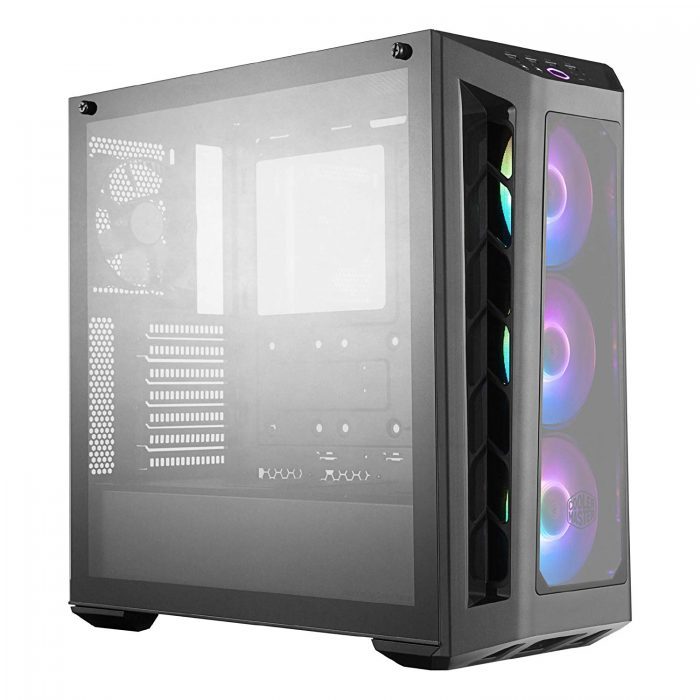
#1 Cooler Master MasterBox MB530P
Dimensions: 19.2 x 9 x 18.4 | Best For: High-Visibility Builds | M/B Compatibility: ATX, Micro ATX, Mini-ITX | Drive Bays: 2 x 3.5″, 4 x 2.5″ | Expansion Slots: 7
+ Astonishing design
+ Simple to build
+ Multiple options for installing liquid cooling
+ Strong construction
− Manual should be more informative

Let’s start with the most expensive, but probably, the best PC case in the market. This trendy mid-size chassis comes with three panes of tempered glass and beautiful RGB LED lights. Although bright and colored fans can’t connect to many motherboard models, they come with a built-in controller that ensures power supply and brightness adjustment regardless of the motherboard model. Another great thing is that this PC case supports all three sizes, ATC, MicroATX, and Mini-ITX pretty well.
MasterBox is a middle-size tower, which means that it won’t take too much space. It’s a bit narrow, and those 9 inches allow plenty of breathing space, as well as enough space for cable management behind the motherboard tray. However, let’s take a look at the exterior.
As you can see, the case looks excellent. The front panel would look nice even with standard plastic, but with a smoky look that tempered glass provides, combined with bright colors of the fans, MasterBox looks fantastic! You can also notice an excellent spot for the power button and ports. There are two USB 2.0 and two USB 3.0 ports, as well as audio jacks, a power button, and a button for lighting control. When you press it repeatedly, you cycle through various lighting modes, which range from static to pulsing.
You can notice that there is tempered glass on sides, too. Although it looks cool, it’s much more fragile than casual plastic panels. Also, it’s prone to collecting fingerprints on the inside, which you can notice only when you’ve built the PC and turned it on. Glass panels can spectacularly shatter if dropped, but other than that, they are perfect and look fantastic. When it comes to transparency and the ease with which you can attach them to the case, these are the best tempered-glass panels that you can find for your PC chassis.
MasterBox is also excellent in the interior. When you remove the right panel, you will see a motherboard tray, with lots of cable pass-throughs that give you plenty of options for sneaking wires from the other side. The power supply compartment has a large cutout that allows you to fit liquid cooling. You can also install a graphics card with a length of a maximum of 410mm and a CPU cooler with a height of a maximum of 165mm. There is enough room for all the typical hardware. It supports two 3.5-inch and four 2.5-inch hard disk drives, depending on your needs. They also come with a handy sliding mechanism that allows you to snap a drive into the place easily.
When it comes to accessories, the Cooler Master keeps things simple. You will get a bag of needed screws, standoffs for your motherboard, some plastic ties, and a short manual. The manual has more images than text, but if you have a little bit of experience, you won’t need it at all.
MasterBox MB530P hits all the high notes. It’s an excellent PC case, no matter if you need it for gaming or any other needs. It has plenty of space, looks beautiful, and is very simple to assemble and disassemble. If you are looking for a combination of gorgeous look and maximum usefulness, MasterBox MB530P will make a perfect choice.

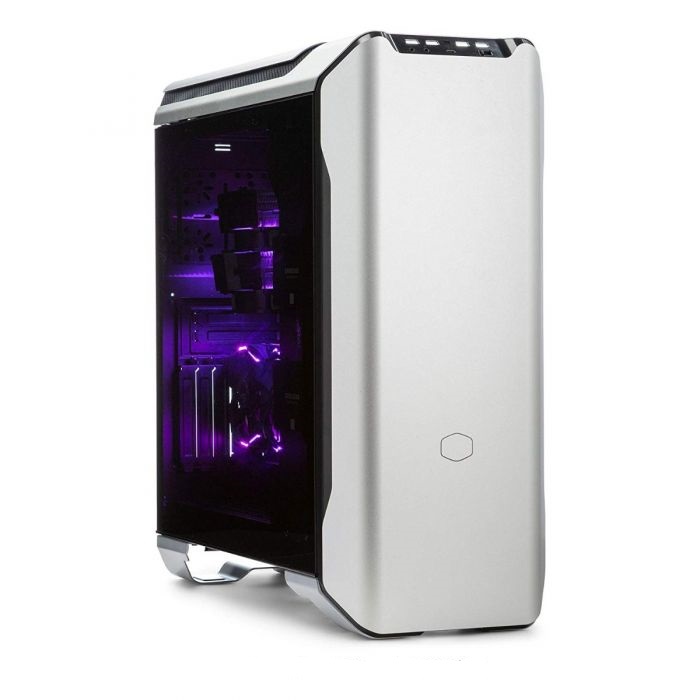
#2 Cooler Master MasterCase SL600M
Dimensions: 22.6 x 9.6 x 21.5 | Best For: Deluxe ATX Builds | M/B Compatibility: ATX, Micro ATX, Mini-ITX, some E-ATX | Drive Bays: 4 x 2.5 / 3.5″ (Combo) | Expansion Slots: 9 + 2
+ Innovative HDD mounting system
+ Impressively quiet
+ Nearly all in metal
+ Big 200mm fans
− No rear exhaust fan
− Some storage mounts are awkwardly placed
If you are looking for an excellent gaming PC case that doesn’t necessarily have to look strange and futuristic, SL600M is probably your best choice. It offers multiple GPU configurations and an innovative hard drive mounting system. Besides, you will be amazed at how quiet it is even under full load.
The chassis weighs only 13.6 kg and looks pretty handsome. It’s built of a combination of sand-blasted aluminum panels and tempered glass, for maximum interior visibility. The top side consists of two aluminum panels with black metal mesh in between. You can also remove the rear part of the top panel for additional airflow. It’s needless to say that this PC case looks pretty cool.
Between the top and front panels, you can notice USB 3.1 Type-C port, as well as two USB 3.0 and USB 2.0 ports, audio jacks, fan switch, and power and reset buttons. There is also a proximity sensor that causes USB ports to light up when triggered. On the front side, you can find a solid aluminum panel which is very easy to remove when needed. The rear side is a bit different from what you can usually see in an ATX mid-tower. It comes with nine expansion slots that can be rotated 90 degrees so that you can install multiple cards vertically.
On the bottom of the chassis, there is a plastic mesh filter that covers two large intake fans. It can be removed from both the front and the rear side of the case. Basically, the filtration system consists of a large one-piece fan filter at the bottom and a metal mesh on the top, creating a “chimney” effect inside the case. Since the fans are pretty large, they push lots of air and create an excellent cooling for your hardware. You can also mount all-in-one liquid coolers to the top and bottom of the case, for even better cooling. It might not be important if you don’t overuse your PC, but if you intend to play high-end games for hours every day, liquid cooling is a must, and shouldn’t be neglected.
So, we can conclude that SL600M features an excellent build quality since it’s nearly all in metal. A motion sensor that lights up frontal USB ports is incredible, and big 200mm fans push a lot of air to provide excellent cooling. On the other hand, we could notice that the rear storage mount is a bit tricky to run cables to, and there is also no extra rear exhaust fan. Other than that, SL600M is an excellent PC case for all the people looking for strong build, component visibility, and a perfect cooling system.
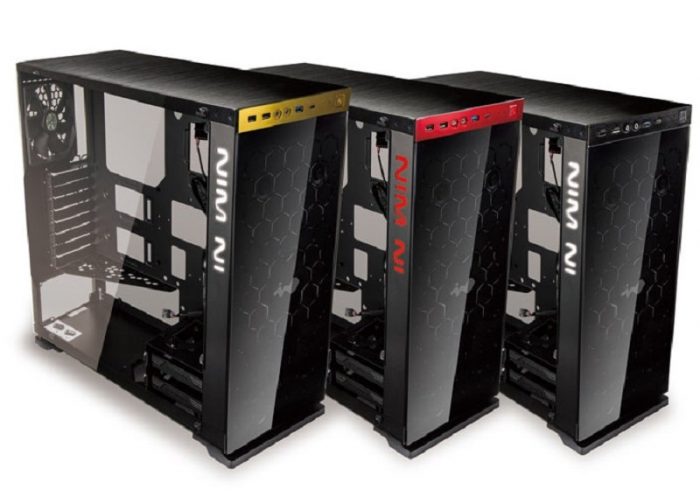
#3 In Win 805
Dimensions: 17.9 x 8 x 18 | Best For: Extreme and Showcase Builds | M/B Compatibility: ATX, Micro ATX, Mini-ITX | Drive Bays: 2 x 2.5 / 3.5″ (Combo) + 4 x 2.5″ | Expansion Slots: 8
+ Attractive glass-aluminum design
+ Plenty of cable routing options
− No LED fans or interior light
In Win definitely found a way to stand out in the chassis market when they released X-frame a few years ago. Shortly after that, we could notice that the company was not interested anymore in making typical-looking PC cases. They realized that they are doing much better at business by designing premium, top-looking chassis. Of course, they still offer plenty of choices for users who don’t want odd-looking stuff.
You might have noticed that lately, most chassis manufacturers started to make glass panels. They are more expensive, more prone to breaking, but it seems that people can’t resist having a visible interior. Of course, when you buy such great hardware, you want to remind yourself of the beast inside your PC case all the time. As you can notice, In Win 805 is almost entirely made of glass. It might be a bit more fragile, but if you are looking for a handsome chassis, it has to have glass panels!
The company has built model 805 as a mid-tower chassis, and unlike the previous models, all the metal parts are made of aluminum. On both sides, as well as on the front, you can find a 3mm thick tempered glass panels. It’s not heat-tempered glass, but instead a chemically tempered glass to make them more sturdy and harder to break. There are three variations of this PC chassis, and the difference is mostly seen in the front panel. One version comes with black I/O interface on the top, the other one comes with anodized red, and the third one with an anodized gold.
No matter which version you buy, everything else is mostly the same. The chassis offers two bays for 2.5-inch or 3.5-inch storage drives, but there are also four dedicated trays for 2.5-inch drives only. It can fit an ATX, M-ATX, or a Mini-ITX motherboard, and the I/O panel comes with USB 3.1 and USB 3.0 ports. There is also a pair of USB 2.0 ports, and of course, audio jacks and power button.
But what about cooling? It might seem that glass panels restrict fan options, but it’s not the case with In Win 805. The front side offers two locations for 120 or 140-millimeter fans, and on the back, you can fit a single 120mm fan, which is included in the package. There is also a fan location on the bottom, but you would have to remove the HDD case to install it.
In Win 805 also offers options for liquid cooling. You can place a 240mm or 280mm radiator with up to 60mm thickness in the front. In the rear, you can place a 120mm radiator of 35mm thickness. Right there, you will also notice a room for an air cooler to cool your CPU.
In Win 805 is a perfect chassis. Having in mind the materials and build quality, it’s definitely worth the price. If you are a person who likes glass panels and visible interior, In Win 805 might be your best choice.
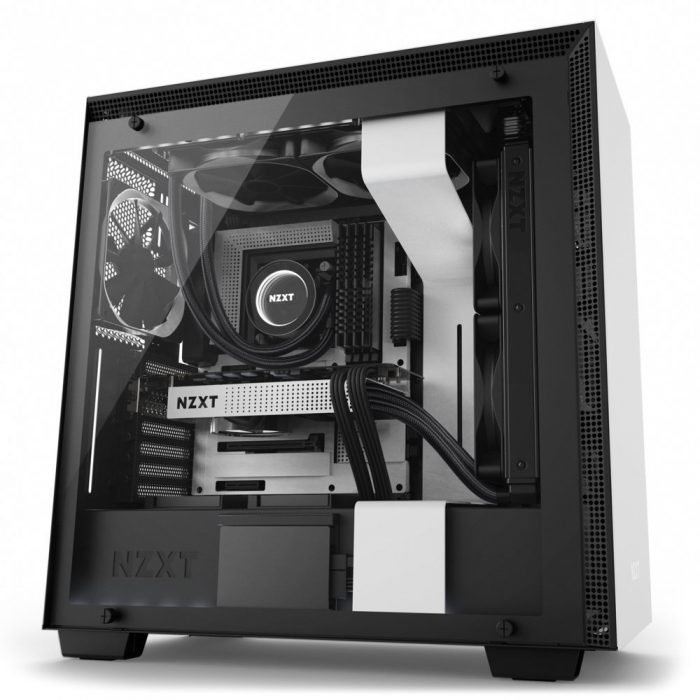
#4 NZXT H700i
Dimensions: 19.5 x 9 x 19.5 | Best For: Showcase Builds | M/B Compatibility: ATX, Micro ATX, Mini-ITX, some E-ATX | Drive Bays: 7 x 2.5″, 2+1 x 3.5″ | Expansion Slots: 7
+ Brilliant for cable-routing
+ All-steel construction
+ Two RGB light strips
− A bit expensive
Despite some of its drawbacks, such as lack of USB Type-C port, H700i is worthy of your consideration if you want to buy a decent PC tower. It features a fantastic cooling performance, a tempered glass panel on the side, and very nice RGB lighting. It also looks lovely, but all of that comes at a bit of a high price.
Let’s start with the exterior. H700i is a mid-tower chassis and comes in black or white as the primary color, and a variety of other colors, which include black, blue, and red. No matter which color combination you choose, they all fit pretty well. The chassis weighs slightly over 12 kilograms and comes with a two-year warranty.
On the top, you can notice a panel with a pair of USB 3.0, two USB 2.0 ports, and audio jacks. The rest of the panel is very smooth, plain, and features a minimalistic design. On the rear side, there is a one-button release mechanism that allows instant access to the area behind a motherboard tray. Also, on the rear of the chassis, there is a motherboard slot, seven expansion card slots, and an opening for a power supply, which is mounted on the bottom. It supports 120mm and 140mm fans, and the exhaust fan mounting location allows sliding the fan up or down, to make room for hardware or fine-tune airflow. The chassis has a fairly good filtration system, so there is a large removable nylon filter that covers fan mounting locations. However, the mounting locations in the top are unfiltered.
When you order this chassis, you will get all the accessories in a small white box, secured in a hard drive bay. The box contains all the needed screws, zip ties, and also an additional LED lighting strip. You also get a pretty decent manual in the package.
The case is equipped with three intake fans and one exhaust fan, and a large bar for cable management. It has plenty of space inside so that you can install a custom cooling loop or reservoir, and also make a multi-GPU setup. However, if you are an inexperienced builder, be sure to ask someone for help, since it might get a bit tricky sometimes.
We need to mention that you should be careful with E-ATX motherboards. Although H700i is pretty big, some E-ATX motherboards measure 12 x 13 inches deep and can’t fit in this chassis. You can imagine what a surprise it would be if you bought this case because you thought that it supports all the E-ATX motherboards.
In the end, let’s mention that the company used the Adaptive Noise Reduction algorithm that continuously adjusts fan speeds based on measured noise and CPU/GPU temperature changes. Besides, it also comes with a fan controller, RGB lighting controller, supports up to four LED lighting strips, and is very good at cable management. Although a bit pricey, this PC case is definitely worth checking out!
#5 EVGA DG-77
Dimensions: 19 x 8.3 x 18.8 | Best For: Showcase Builds | M/B Compatibility: ATX, Micro ATX, Mini-ITX | Drive Bays: 4 x 2.5″, 2 x 3.5″ | Expansion Slots: 7
+ Integrated RGB LED light controller
+ One-button overclocking feature
− A bit tricky when it comes to building
− Tons of branding
DG-77 is a handsome mid-tower chassis, at a reasonable price, with some unusual features such as a one-touch overclocking button. It also allows vertical graphics card installation, although it can be a bit tricky.
EVGA is not a very popular company, and the chances are that you probably haven’t even heard of them. Also, the DG-7 series features the company’s first mid-tower family. The line has four models, which are DG-73, DG-75, DG-76, and DG-77. The one that we are reviewing costs the most of all, and is the only one that comes with a K-boots overclocking button. Another interesting fact is that you can build your whole setup using only EVGA products, since they recently started a mouse line, too.
You can buy this tower in black or white color, and both look nice. It weighs only 10 kilograms, and the black variant comes with tinted glass, to keep the dark theme. DG-77 has a very sleek look, especially since it doesn’t come with any LED strips or LED fans. It’s the best choice for people who are looking for minimalism in a PC chassis.
On the right side, there is an entirely opaque side window. Probably the assumption is that nobody wants to look at the nest of wires, but on the other hand, cable management gurus won’t be able to show off their skills completely. There are three tempered glass panels, and all of those are held in place with thumbscrews that look pretty nice. With 16 thumbscrews that have EVGA logo on them, you can hardly forget who built this chassis. Although, it might be a bit annoying watching their logo always, no matter from which angle you look at the chassis.
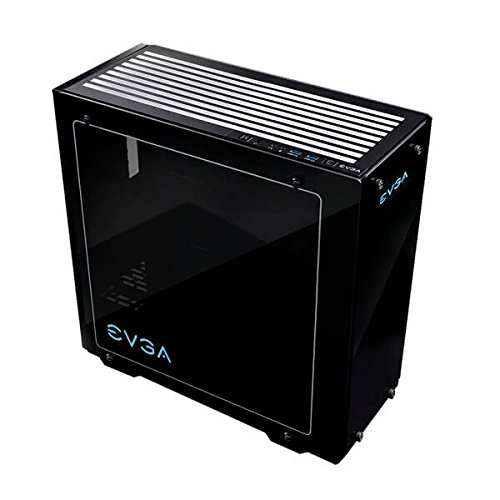
Among all the attractive and unusual features, DG-77 also has a removable top panel. You will notice that nine canals offer ventilation and provide an escape route for hot air while positively affecting the design. On the top panel, there are necessary USB ports, a power button, audio jacks, and a K-boost button. If you are not familiar with K-boost, it works with EVGA’s software that offers a one-touch overclocking for both your CPU and GPU. Overclocking is not recommended to be done consistently and for more extended periods since it might reduce your hardware’s lifespan. However, if done correctly, it can only enhance your gaming experience.
We should mention that when it comes to building, it can get a bit tricky for beginners. It’s both pleasure and pain. For example, let’s say that you want to add fans to the top of the chassis. The best way to do it is to remove the top panel first, by unscrewing the four thumbscrews and setting the panel aside. Once you do that, you will notice that there is a lip that you can grab on the top panel. It requires a bit of a force, and some people might find it unpleasant and unsettling, especially when the chassis is new, and you don’t want to damage it in any possible way.
Installing hard drives is slightly simpler. There are four mounting brackets, but they can also be a little bit tricky to use for inexperienced builders. On the other hand, installing a motherboard is quite easy. The trickier part is cable management, which is definitely not the best cable management we have ever seen. On top of all of that, rear expansion port covers are also not easy to remove.
If you ignore that installing a graphics card vertically can also be a bit tricky and that the chassis has tons of EVGA branding, all the rest is fine. It has a decent price tag and is definitely worth it. Be sure to check it out!
#6 Corsair Carbide Clear 400C
Dimensions: 18.3 x 8.5 x 16.7 | Best For: On-budget Builds | M/B Compatibility: ATX, Micro ATX, Mini-ITX, some E-ATX | Drive Bays: 2 x 2.5″, 3 x 3.5″ | Expansion Slots: 7
+ Classy, minimalistic, and simple design
+ Compact, but still supports E-ATX motherboards
+ Multiple dust filters
− No fan controller bays
− The front panel is a bit tricky to remove
In the end, let’s mention a compactly designed PC tower that, despite its compactness, supports E-ATX motherboards. As you can notice, it doesn’t scream for attention. The design is pretty sleek and subtle. If you are into classy styling, this PC case is undoubtedly a good option. The company also offers a non-windowed version, which is quieter, and instead of a large window, uses a black side panel, with sound-dampening lining on the inside.
Although it is mostly steel on the outside, it weighs only 8.2 kilograms. Besides steel, there is also plastic in the form of ventilation dividers, door handle, and the feet. The reason we mention that is because it directly affects the quality of construction. For example, removing the front panel requires plenty of force, and significantly increases the chance of breaking one of the plastic clips.
![]()
400C can take up to five storage devices, including two 3.5-inch drives in the bottom and three 2.5-inch SSDs on the back of the motherboard tray. It should be plenty of space for any build.
The case comes with a pre-installed 140mm fan to draw cool air and a 120mm exhaust fan. You can also add another 140mm fan in the front, or take out the pre-installed one and install three 120mm fans as front intakes. Besides, you can add another two 120mm or 140mm fans on top, or install the liquid cooling. The case supports a radiator of up to 360mm in the front, 240mm radiator on top, and a 120mm radiator in the back.
When it comes to building, the only problem we encountered is a broken clip while we tried to remove the front panel. Other than that, everything was perfectly fine. Side panels are easy to remove, and installing all the hardware is also pretty simple.
As you can notice, 400C is a pretty decent PC case. It’s definitely not the best solution, but it’s worth the price – and maybe even more! With a nice, classy style, and support for E-ATX motherboards despite its compactness, it’s the best chassis that you can find in that price range. Be sure to check it out!
Budget PC Cases: Shopping on a Budget
For all the people who want to buy a PC case on a budget, we are mentioning some of the best, yet affordable cases.
Best CPU Cabinet Priced Under Rs. 3000
If you don’t want to spend more than 3,000 rupees, your best choice would be Corsair Carbide CC-9011050-WW. You can find it at a very reasonable price, especially if you get the advantage of very frequent discounts.
Best CPU Cabinet Priced Under Rs. 1500
However, if you don’t want to spend more than 1,500, be sure to check out Foxin FC-1101.
Best CPU Cabinet Priced Under Rs. 1000
You may checkout Frontech Shine JIL-4195, which costs less than 1,000. Another option is Zebronics Zeb 122-R Serenity, which costs less than 1,000 and supports up to 6 hard disk drives.
Best CPU Cabinet Priced Under Rs. 500
In the end, if you are looking for a cheap solution, the best choice would be RECON Hpgh, which currently costs even less than 500 rupees.
Computer Cabinet Without SMPS
As a bonus tip, if you are looking for a PC case without SMPS, the best choice would be Circle Gaming 836 Case.
A Few Words in the End
We made this guide to help you buy the right PC cabinet for your needs. The ones that we listed are the best that you can find in India, and there are chassis’ for everyone’s budget.
If you have any questions or suggestions on this topic, don’t hesitate to let us know in the comments below.